In late 2019, in a fit of pique at Skylum Software’s apparent disregard of promises to their existing customer base, I went looking for a new photo processing tool. As an acquaintance of mine so eloquently puts it, a dark room app. The app I discovered was the magnificent DxO PhotoLab version 3.
A year on, PhotoLab 4 was released and this only improves on the core strengths of the product — its ability to tame noise, and to extract maximum sharpness from RAW image files. Both of these are now achieved by means of DxO’s unique Camera and Lens Modules, which are built by profiling actual equipment in a laboratory, and some clever use of machine learning.
While the digital asset management features of PhotoLab aren’t quite up to scratch for my purposes, I have stuck with it because no other product I have tried can get close to the quality of RAW conversion that PhotoLab can achieve.
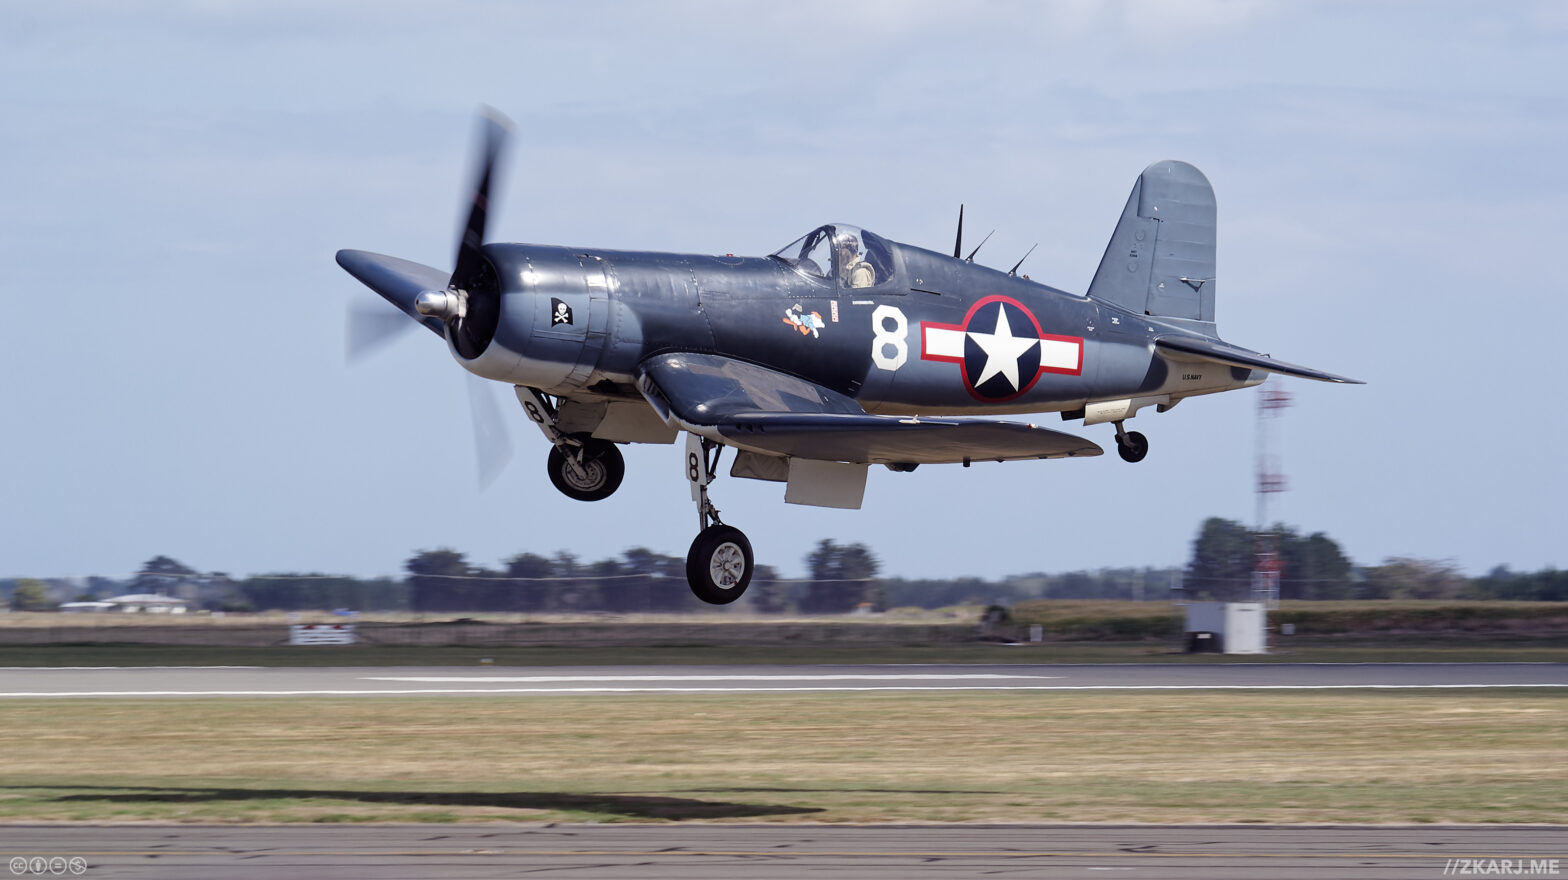
At the top of the page, and below, here is a photo I recently reprocessed in PhotoLab 4. Take a look at the sharpness evident in the panel lines, paint and scuffing, and the textures of aluminium riveted to a frame. (Click on the image below to go to the Flickr page for full size.)

Now consider this was taken very nearly 13 years ago with a 10 megapixel camera. Clearly I nailed the panning required for this shot, but the nearly-pin sharp detail is extraordinary. If you’d asked me 6 years ago whether this photo was sharp I would have said ‘not really’. But then I got my first Apple computer with a Retina display and that changed my definition of sharp.
I realised that the elusive sharpness I had long sought was, at least somewhat, down to having a good enough display. But even then, I wouldn’t have said it was pin sharp. That came with PhotoLab.
Moving my story on, I was roaming around my back garden on the last day of 2020 with my current camera — the 24 megapixel Pentax KP — sporting a delightful lens — the Tamron SPAF 90mm f/2.8 Di Macro 1:1. This lens is fun to play with because it can focus super close — a mere 29cm from the camera sensor. The front of the lens is about 14cm from the sensor, so imagine a subject only 15cm in front of the lens. At this distance, the image on the sensor is life-sized. The down side to all this comes with the depth of field (DOF). At the widest f/2.8 it’s approximately 1mm! Stop the aperture down, you say? Moving to a light-sapping f/32 brings the DOF to a whopping 3mm.
Did I say this is a fun lens? Getting in super close for a detailed look at something small is neat, and dealing with that depth of field is challenging. My target that day was flowers. We don’t have much in our garden currently so I was aiming for the numerous agapanthus that seem to flourish without human care. These are multi-flowered heads which offer some decent colour — white or purple — to contrast against the green foliage, and with lots of flowers in close proximity, some fun opportunities for depth of field effects.
While taking one of these shots, I noticed as I looked through the viewfinder that there was a small bug on one flower. It was winged, and I was pretty close, so the chance of it flitting off seemed high. I quickly recomposed and refocused on the bug. So this was not a deliberate photo that set out to capture the bug, but rather a hastily captured opportunity, and was the only image of the session that I bothered to publish. This is how I processed it. The image is the full original frame height but cropped to square, simply removing more green bokeh in favour of a better balance.
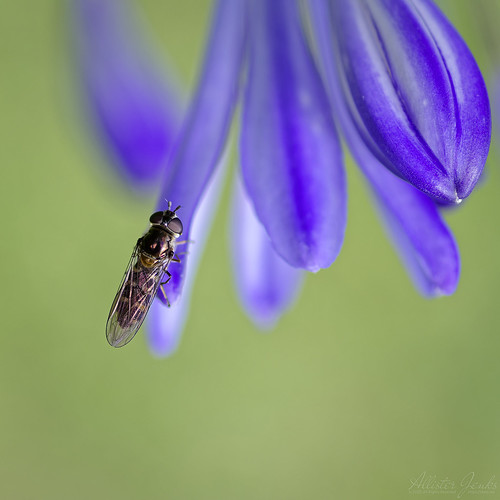
I was pretty pleased with my lucky shot and it garnered a few ‘faves’ on Flickr as well as positive feedback in other places I showed it off.
It was later when I was explaining to a friend just how good PhotoLab was, that I needed to grab an example shot and, this being my most recent at the time, I brought it up in PhotoLab and zoomed in to 1:1. I grabbed a 1600 pixel square screenshot around the bug to show my friend, and compared it to a very similar crop taken from Apple Photos’ rendering of the same RAW file. I’m not sure I convinced my friend, but I could see the detail was definitely clearer in the PhotoLab shot, and at this point I realised just how much detail was really there. But… I generally publish my photos at 3200 pixels wide and this was only a 1600 pixel crop. It was then an idea hit me.
Another remarkable piece of software I own is Pixelmator Pro. I bought this software for a single feature it added recently, called Super Resolution. This is also a machine learning-powered function. It’s purpose is to scale images up in size while keeping them sharp. I’ve tried it on all sorts of images and it is remarkably good. I wondered how well it would do at doubling the dimensions of my close-in cropped bug. Here’s the answer.
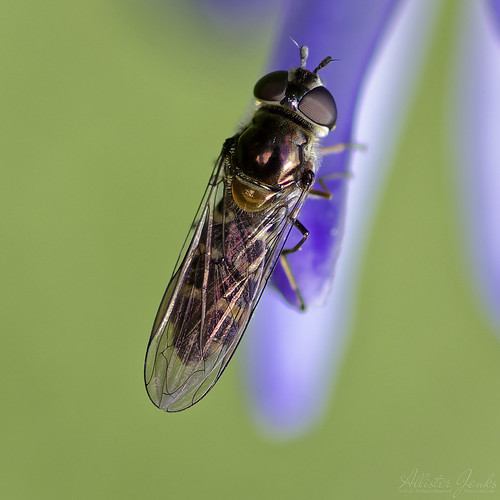
I can’t tell you how big the bug really was, but my memory of the brief look I took outside of the camera says about 4-6mm long.
This image is the result of many levels of superb technology. The awesome Tamron macro lens, the excellent sensor in the Pentax KP, the amazing RAW engine in PhotoLab, and the impressive Super Resolution upscaling in Pixelmator Pro. I recommend all of them.