The Problem to be Solved
For many years, I have struggled through the process of scanning old negatives using a flatbed scanner. I even wrote a post on the particular struggle that was Scanning Negatives with VueScan (Multi-frame).
While I managed to scan quite a lot of negatives using VueScan or other software, and using two different scanner models, it was never easy. Or fast. VueScan affords the most control, but also takes the most setup. Epson’s scanning apps, bundled with their scanners, take less setup, but when they don’t give you what you need, they’re even worse than just using VueScan.
Then there was the software-hardware problem I had — have — with my Epson scanner. There is some piece of software on my Mac that causes the scanner to lose touch with the computer mid-scan. It only happens with high resolution scans… such as required for negatives! I found a workaround by creating a separate user account, but that means I can’t really use the computer for anything else while waiting for scans.
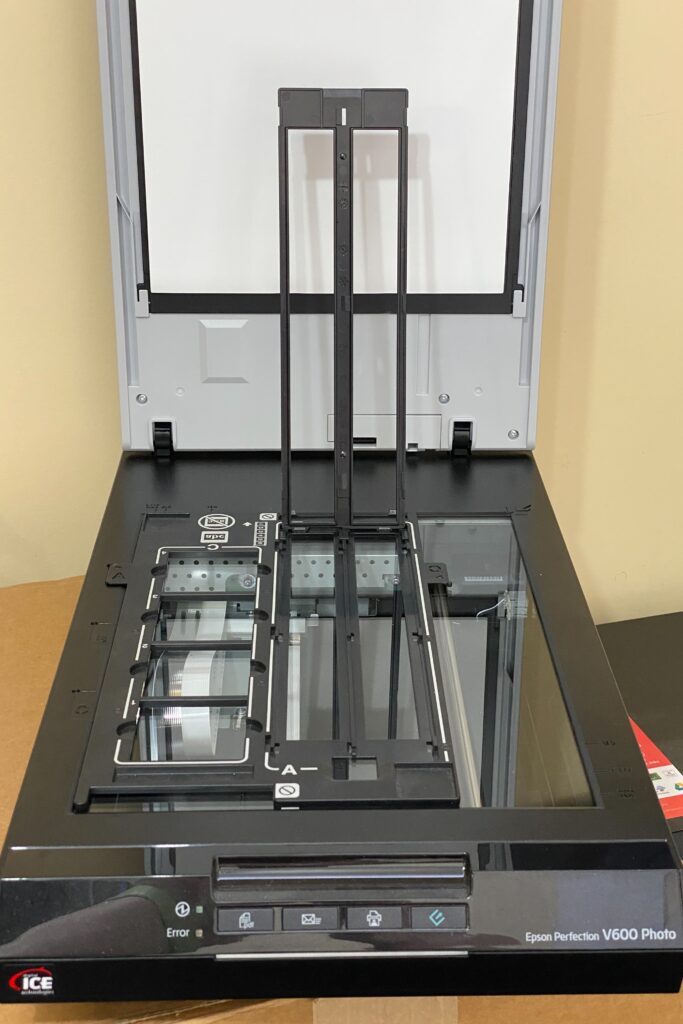
Even when everything is behaving, flatbed scanning at 4800 or even 3200 dpi is not exactly blistering. I forget the exact timing, but with my Epson V600 I can typically set the scanner going on a batch of eight1 negatives and then have to wait somewhere between five and ten minutes for it to complete. For the ‘perfect’ 24 frame film in 6 strips, that’s well over 20 minutes of scan time alone. This also means I can’t go off and do anything else for more than 20 minutes or I will slow the whole process down even further.
I mentioned two resolutions above — 3200 or 4800 dpi. The wisdom I found, back when I started scanning, was that “archival scans” should be done at 4000 dpi or higher. My scanner does 3200 or 4800, so I chose the latter. However, I started doing 3200 dpi scans, particularly on less important films, to save space.
Even scanning at 3200 dpi, a full colour TIFF averages over 64 MB in size with compression. Some of my earlier 4800 dpi scans didn’t get compressed and are all over 160 MB each! Contrast these numbers with a 24 Megapixel RAW file from my DSLR, which averages 30 MB.
Granted, there is more information in a TIFF file than a camera RAW file of the same dimensions, but that lack of information isn’t really a consideration for my modern digital photos.
So the process is fiddly, slow, and creates huge files. These things made me only attempt new scans when I was really in the mood for it. Or, more likely, when I had a hankering for digital copies of some specific photos.
On an episode of the Accidental Tech Podcast, they were asked about digitising photos and one comment the hosts made is that no matter how much you spend on gear, you will never finish the job of scanning all your photos. I totally believed in that because of everything I have described above.
Then I stumbled across a YouTube video that I thought was worth a watch. I’m glad I did, because it’s changed everything for me.
What is Scanning by DSLR?
Put simply, you take a photo of each negative using your DSLR camera (or you can use a mirrorless interchangeable lens camera — MILC). There is quite a lot to unpack in making this successful, however.
I’ve seen some proponents of this method refer to it as “using what you have” but to do it well, and efficiently, it does require you have quite a lot.
Required Equipment
While there are many items you can use to perfect this method, the following are absolute requirements.
- A camera. DSLRs and mirrorless cameras are ideal. You’ll need to be able to shoot RAW, too.
- A macro lens. Ideally something in the 90-120 mm focal length range that allows manual focusing.
- A bright light source. A reasonably modern iPad can do a decent job here.
- Any photo processing software that has a curves adjustment. You don’t need Photoshop for this, but it would certainly fit the bill.
That’s it. That’s all you need to do the job. But with only those things, you might find the process more cumbersome and time consuming, or your results may not be as good as you want.
In the following sections, I will cover all of these areas plus some extras to make things easier or better. For each area, I will explain how I addressed it, and why I went that way.
Camera
This was easy for me. I have owned and regularly used a Pentax DSLR since 2005. My current one is a KP which has 24 Megapixels. This is ideal for the task.
You can use any reasonably modern DSLR or MILC to get fantastic results. Other cameras may also fit the bill, but I would strongly recommend shooting in RAW as you will be messing with colour on every frame, by necessity.
To be honest, if I didn’t already own such a camera, this post wouldn’t exist. I do think this is one of two items you should already have, or at least if you do make a purchase, don’t make it just for this task.
One other minor mention, in case you choose a different sort of camera — a tripod mount is really a must.
Lens
You will need a macro lens. This is a simple physics thing. In order to have the negative fill most of the frame, and be close enough to be practical, you will need a macro lens. This is the other item that can be expensive to purchase for just this task.
Fortunately, I had scored a second-hand Tamron 90 mm macro lens. I honestly don’t use it a lot in my normal photography, but it is a well regarded lens that I bought both for its macro capability, and as a mid-range prime lens.
Film Holder
I didn’t mention this in the required list, but without one, the task is a lot harder. I very briefly experimented with going ‘naked’ and I can assure you it is infuriatingly difficult.
The product I use for this was the catalyst for this whole exercise for me. I came across it in the video I linked in the introduction. The Essential Film Holder was created by a person who was trying to come up with an efficient process, and who also happened to be an engineer. It is cheap, versatile (if you have different film formats you want to capture), robust, and easy to use.
Light Source
Initially, I captured a few films with the ‘something you already have’ option — my iPad mini (5th generation). iPads give off a very even and reasonably bright light. I have no qualms with the results I got. However, it is not so bright that I was getting short shutter times, so in pursuit of more speed, I sought a better device.
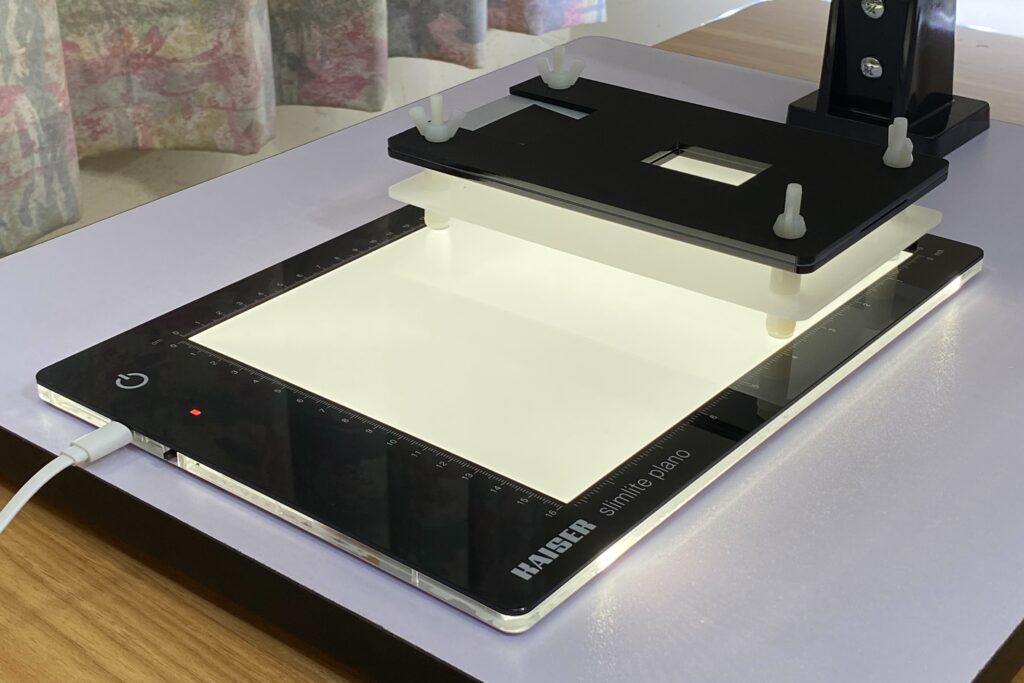
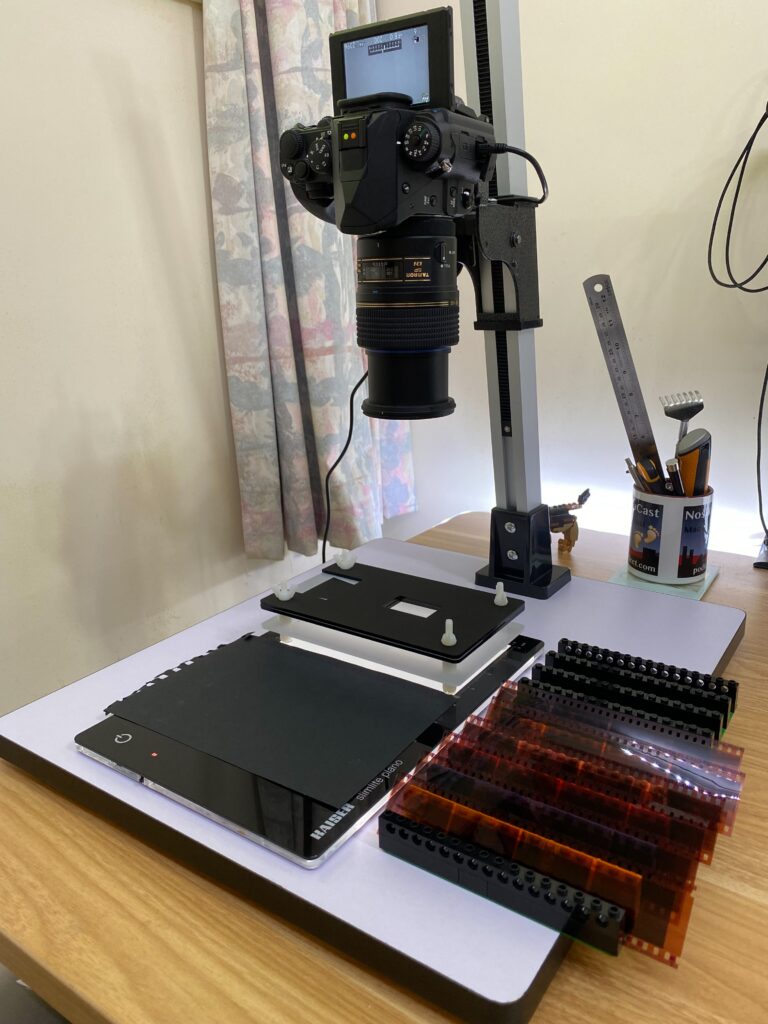
After much searching across Amazon and local online sellers, I settled on the Kaiser slimlite plano. This is purpose designed for back-lighting negatives — ostensibly as a viewer, but it is an excellent tool for this job.
After switching from the iPad to the Kaiser, my shutter speeds dropped considerably, though I have noted it does not seem to go as bright when operating on battery. That’s not a problem for this task, however, as you’ll almost certainly be doing it somewhere you have power. Also, having it mains powered means you needn’t worry about the battery running out mid-session.
This was the single most expensive purchase I made since embarking on this exercise.
Camera Mount
Initially, I used my already-owned Velbon Sherpa 600 tripod. This has a centre pole which can be removed and inserted from beneath, enabling the camera to be mounted facing straight down.
While you can shoot your negatives on any angle, gravity tends to make things harder if you don’t opt for the straight down approach.
Using my tripod worked, but had two significant downsides. First, the amount of adjustment to get the camera aligned with the film plane was considerable. Second, there was always a tripod leg in the way!
My next-most expensive purchase for this exercise was a copy stand. I wished I had had the foresight to grab Dad’s old one, but it was long gone. It was a difficult job finding one I could trust to be sturdy and accurately constructed, without spending a fortune.
I eventually found a generic “C082” copy stand at a local supplier. I had found a very similar one in more well-known online-only sites, but it had a pair of clip-on arms with lights (in some cases bulbs, in other cases LED panels) and was USD$300. The cheapest ‘brand name’ stands I could find started at USD$600!
I’m happy to say I scored the basic stand from PhotoGear (linked above) for a very reasonable NZD$99.
It is far larger than I need for this task, as I have the camera less than half way up the arm, but it is well and accurately built, and sturdy.
Extras
I can get great results with just the above hardware, but there are a few more things I recommend, most of which come cheaply.
Some time ago, I purchased an AC power supply for my camera. This was for a planned tethered shooting project, but that stalled. It’s perfect for DSLR scanning, as it frees me from worrying about the camera battery. Particularly because the Pentax KP’s battery is on the small side.
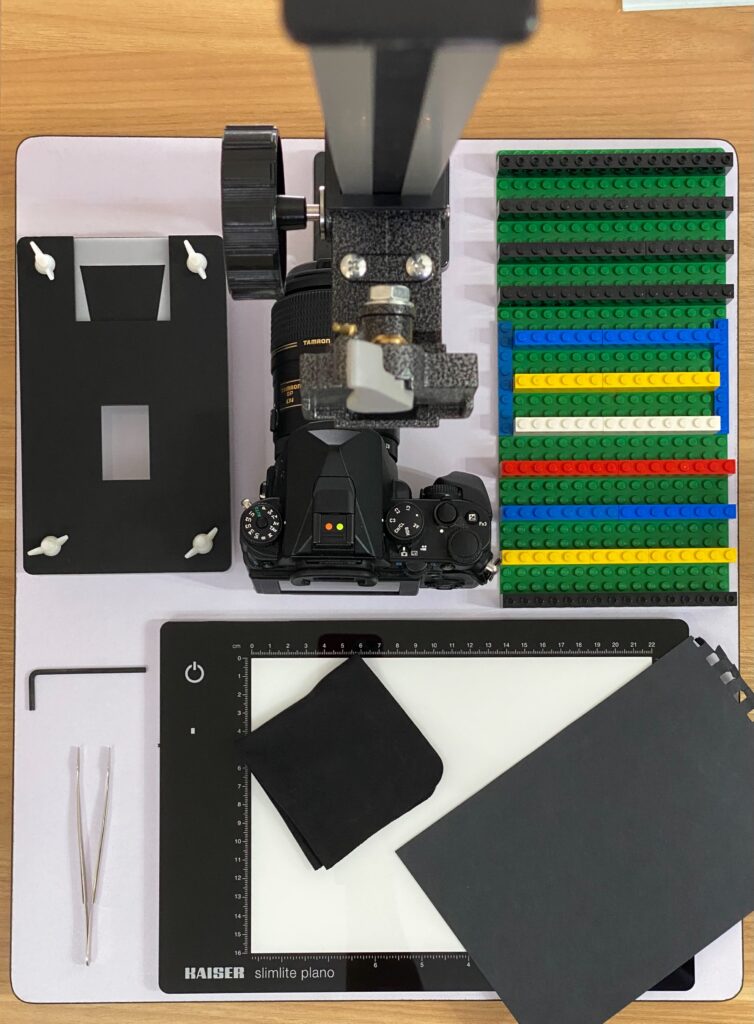
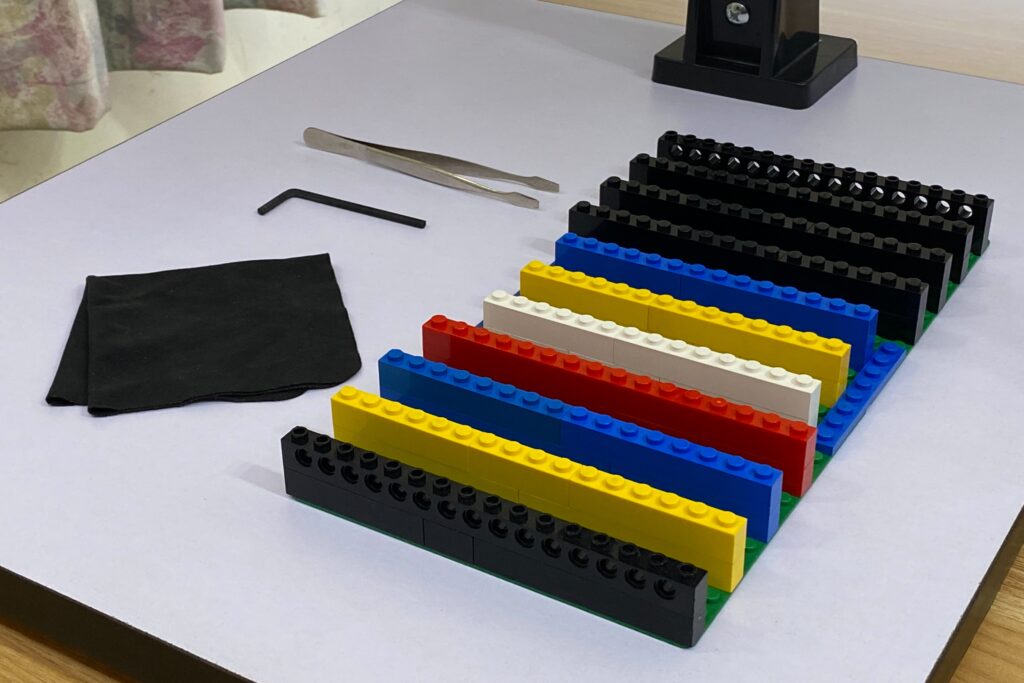
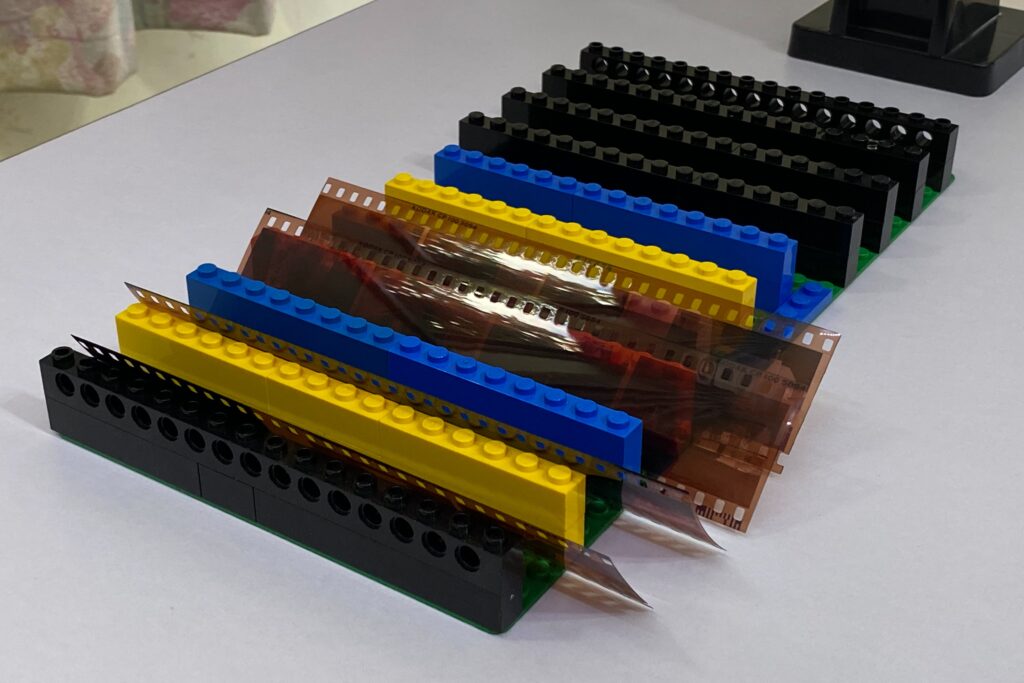
I built myself a negative rack to hold the negative strips in easy reach. After looking for some kind of product to purchase, and failing, I raided my childhood LEGO drawers and built myself this little contraption.
Because the shooting process happens in the dark, having the film strips within easy reach, in the right order, and the right way around is a significant efficiency boost.
Speaking of the dark, my light panel is about twice the size it needs to be for the job, so I have an off-cut of black paper which I use to cover half of it, to prevent stray light.
A pair of stamp tweezers are ideal for fetching the negatives out of their sleeves, but I also found another task they work perfectly for. Some negative strips are short, maybe 2 or 3 frames only, and this makes them problematic to push or pull through the film holder. As the sprocket holes are partly visible in the holder window, I found a corner of the tweezers will perfectly engage a hole and allow me to accurately move the strip along.
I also have a small Allen key on hand. This is not the perfect tool for the job I use it for, but I can’t find anything better so far. The goal of the Essential Film Holder is to hold the film as flat as possible. However, negatives have a tendency to bow if not stored tightly packed. I have found a small number of films where this has made it problematic to get the leading edge of the strip to enter the exit channel of the film holder. Holding the long end, the Allen key can be carefully inserted through the side of the film holder and, once under the film, rotated carefully to provide an upwards pressure to the centre of the film. Done with care, this makes it possible to push the film into the exit channel.
Lastly, I have a microfibre cloth handy. This can be used for removing any dust from negatives, or from the light source or film holder. The one I use is one that, I think, came with an Apple device, but those such as supplied for cleaning glasses or camera lenses are ideal.
The Shooting Process
This is where the investments above really pay off. I said in the introduction that a single 24-frame film would take well over 20 minutes to scan on my Epson V600. As I have been steadily improving my process of DSLR scanning, I have taken note of timings.
I recently grabbed a packet that had 6 films in it, shot by my parents about 25 years ago. I captured the films over two sessions. The first three films took me just over half an hour to capture, but I did not offload them from the camera. For the second three films, the total time from picking up the film packet to having all 161 positives sitting in Lightroom ready for further work, was 45 minutes. Adding that up, and I include the negative-to-positive processing because that is handled by software during the scanning process in the flatbed method, that is 161 frames in 75 minutes. To put it another way, it is over two and a half times2 as fast. With practice, and perhaps some efficiency tweaks, I expect to achieve a speed over three times faster than the flatbed. Not to mention substantially less problematic, and with the results taking significantly less space.
Anyway… on to the process.
Preparation
Setting up the light panel and film holder is relatively easy. I have learned which way around and roughly where to put them. After attaching the camera, I take maybe 30 seconds to precisely align everything.
For the camera, I have preset most of the settings I use in a “user mode”, so all I need to do is select that and then switch the camera and lens to manual focus. I then insert a strip into the film holder and use the “Live View” with focus peaking to quickly set the focus.
At this point, the basic equipment is set and ready for as many films as I feel like doing, with no further changes required. The film holder’s grippy feet stop it from moving across the light panel at all, and the light panel is heavy and grippy enough not to move unintentionally.
Next, we have the per-film setup. I mentioned above that a little preparation here saves considerable time when shooting. I identify the first strip of negatives, using the frame numbers on the film itself, then orient it so I can transfer it straight from the negative rack to the film holder so the first numbered frame will be the first through the window.
I then go through all of the other strips, checking the frame numbers, and inserting them in order in the negative rack. This checking process is aided by uncovering the ‘spare’ half of the light panel so I can easily see the numbers.
It doesn’t so much matter which way around the negatives are with respect to the camera, as flipping and rotating is usually done easily in software later.
With my few tools (tweezers, Allen key, and cloth) handy, and the negative rack alongside the light panel, I’m ready to begin.
Camera Settings
I mentioned above that I have most settings ‘baked in’ to a user mode on my camera. The key settings are these:
- Manual focus — it won’t need to change once set.
- Base ISO — use your judgement. Generally a lower ISO will mean less camera-induced noise, but depending on your light source, it may also lead to longer shutter speeds.
- Aperture Priority — and set your lens to that at which it is sharpest. This is usually somewhere around f/8 for most lenses. The shutter speed doesn’t matter much on a copy stand.
- Exposure Compensation +0.7 — this is recommended, with the camera choosing the exposure for each frame. See the end of the article for the source of this trick.
- Timer 2 seconds — I’m waiting on a remote shutter release, but until then, the 2 second delay lets vibrations from my hand die out before the shutter fires.
I have a few other little tweaks but they relate to how I normally use my camera versus shooting on a copy stand in a dark room (like turning off shot review). These are not critical.
Shooting
Before starting to shoot, I position my chair for comfort, then turn out the lights (I will have pulled the curtains earlier if necessary). I have smart lights and can turn them off and on from a special keypad on my desk, which is super convenient.
With the lights off, the first strip is inserted into the holder and the first frame aligned by eye to the centre of the window. Then I click the shutter.
Once the shutter has opened and closed, I push, or pull, the film to the next frame.
As each strip is completed, I place it back in the negative rack with the opposite lean, making it easy to keep track of where I am up to.
That’s it! When a film is complete, I turn the lights back on and put the negatives back in their sleeves. If continuing onto another film, I set that up in the negative rack and turn out the lights again.
Software
Once you have photographed your negatives, you have negatives. Not positives. You will need some software to do the conversion. Almost any ‘photo processing’ software will do the basic job using a couple of simple techniques.
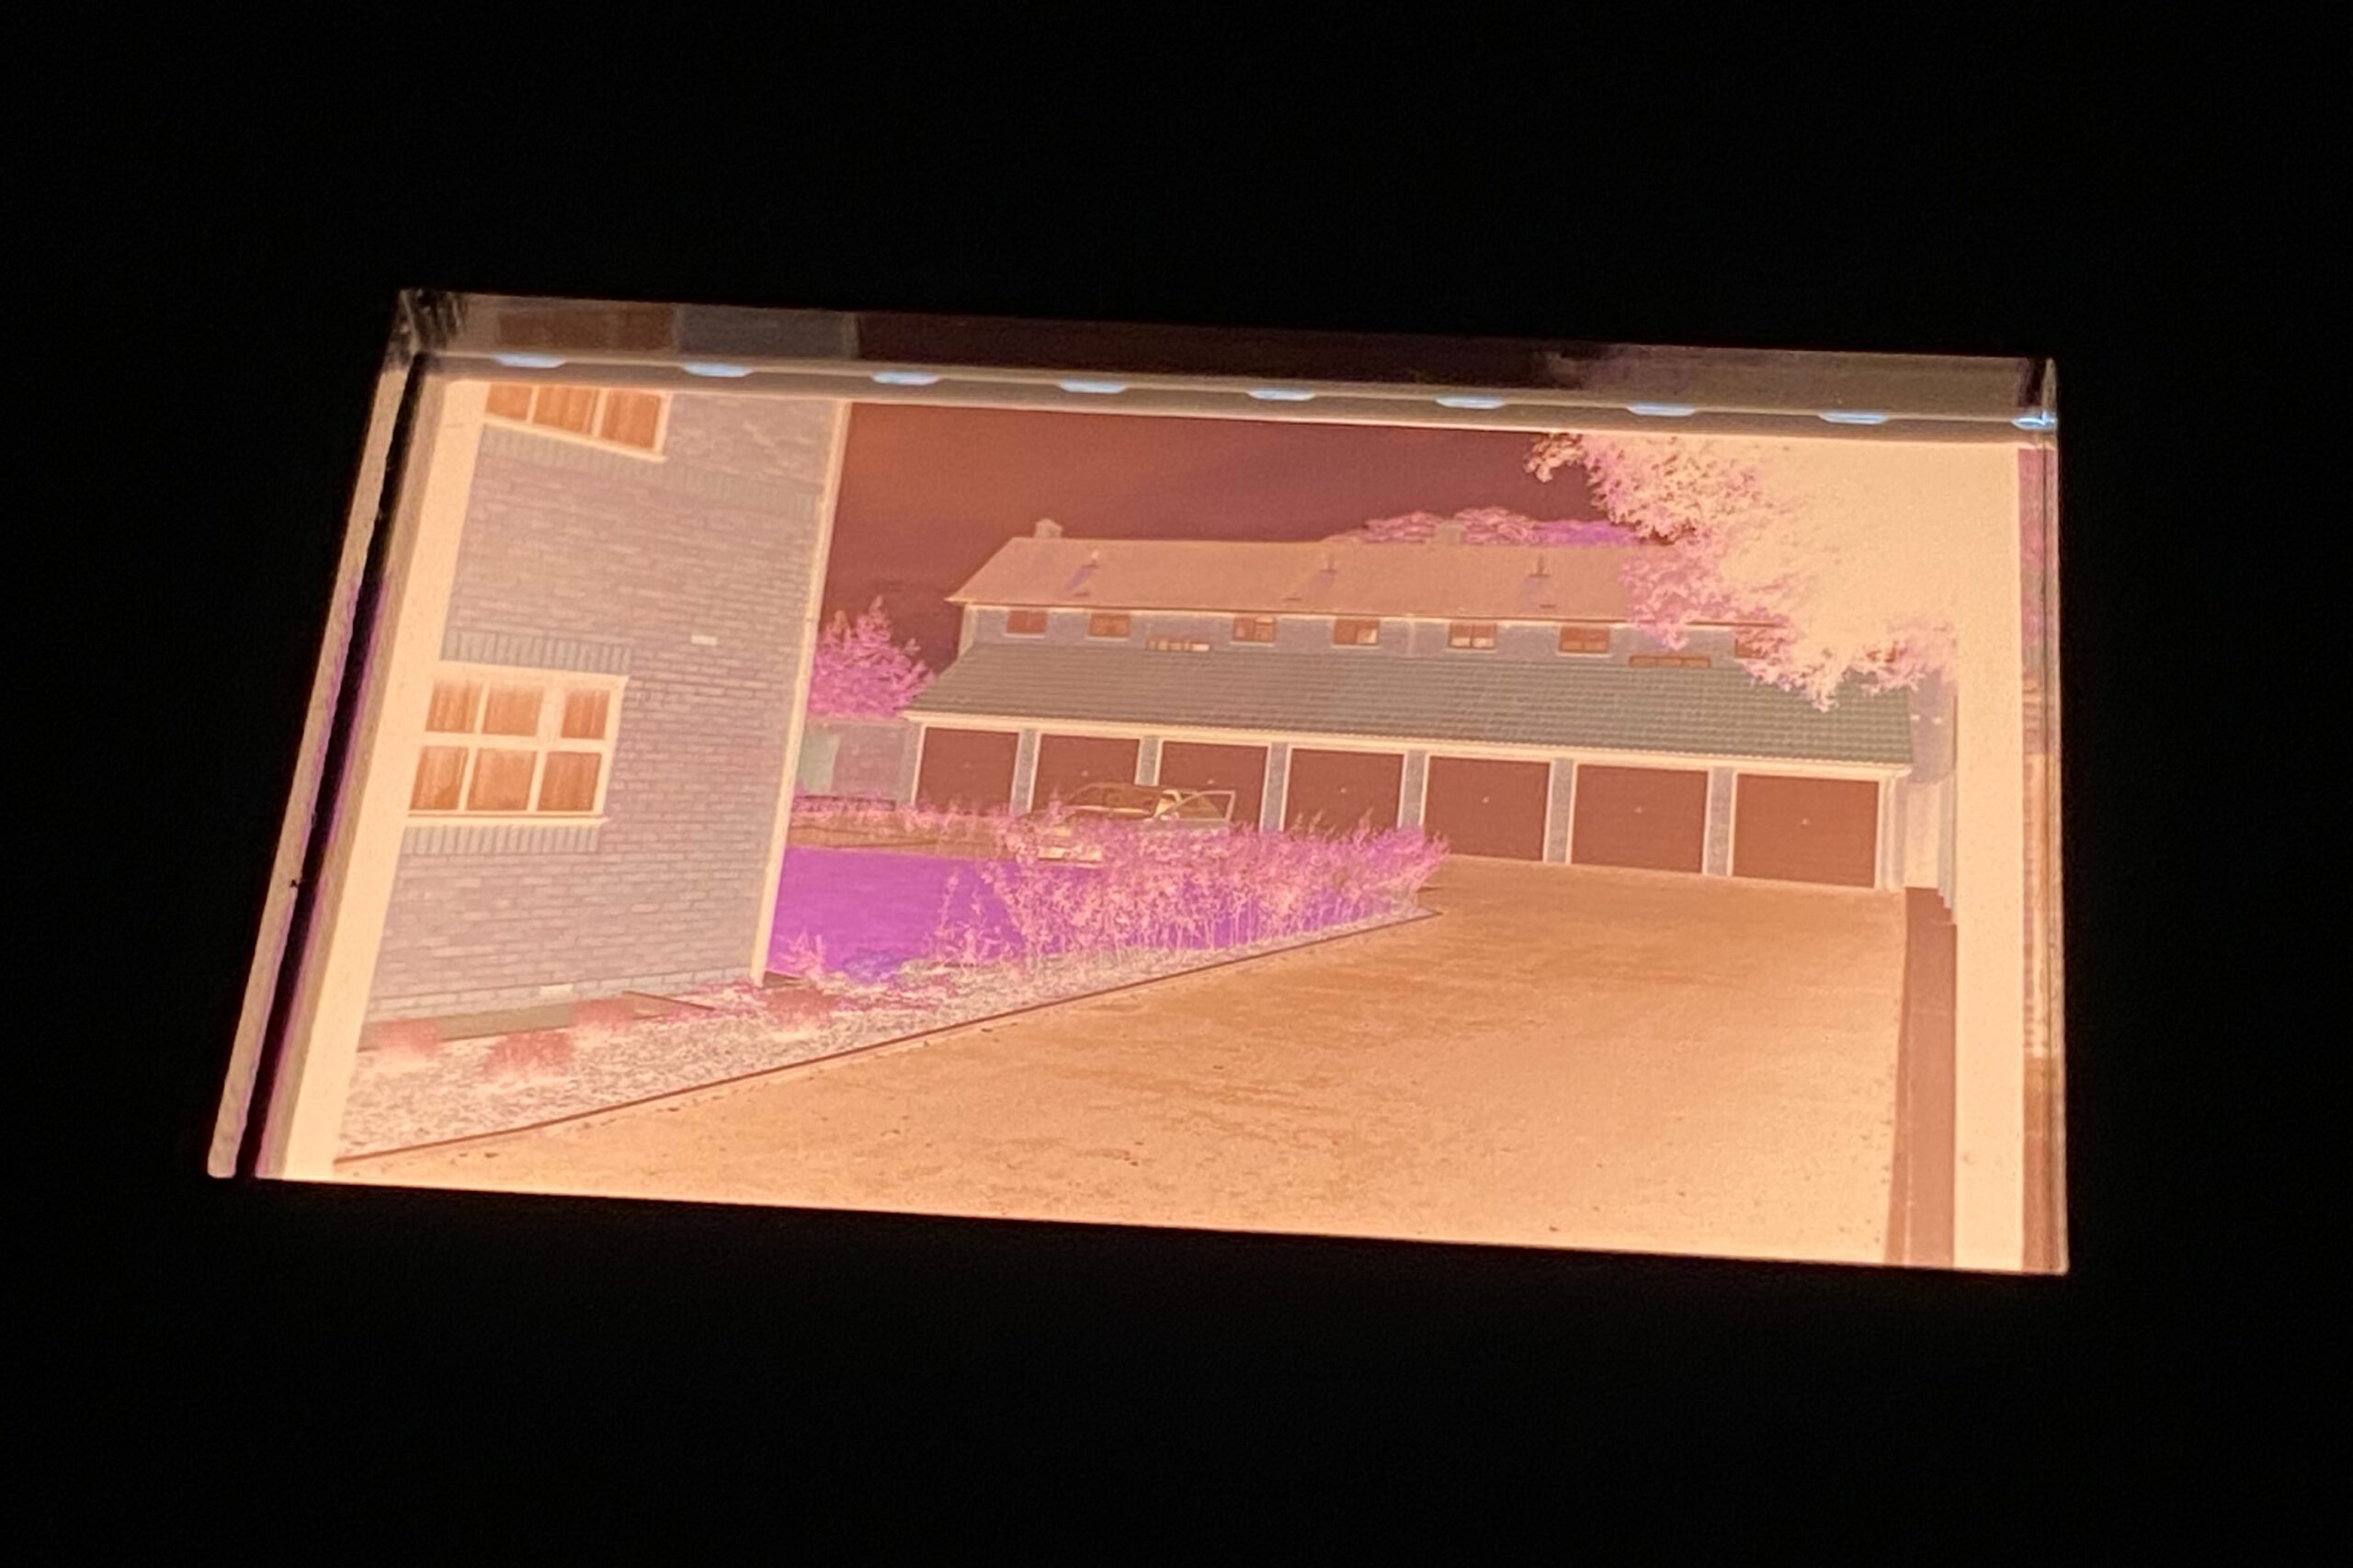
The first step is to set the white balance using the eyedropper tool on an area of the film outside the frame. This will remove the colour cast of the film stock3.
The second step is to invert the colours. This can be done quickly using a curves adjustment, however there is a catch here. An unaltered curves graph will be a straight line from bottom left to top right. If you reverse this angle — from top left to bottom right — you have inverted the colours.
The catch is if you do this with the master curve, a lot of the other controls will operate in reverse! A better way can be to individually reverse each of the red, green, and blue curves. You can then use the master curve in the usual fashion, and a lot of the other tools will behave as you expect. Though not all!
There are various other steps I learned to improve this basic result, including adjusting the angle of each of the colour curves based on the histogram, but every extra step is just that. An extra step. While the basic three-curve reversal can usually be done with a preset, you then need to ‘rescue’ the tonal ranges of each before applying any desired ‘editorial’ changes.
I looked at several pieces of software that claim to automate this, and one came out head and shoulders above the rest. At a cost.
Negative Lab Pro is cited by many as the best tool for the job. From what I have seen, I will add my voice to that. The downside is it is only available as a plugin for Adobe Lightroom Classic. If you already own rent Lightroom Classic, that’s hardly a downside. I didn’t. In fact I had only recently decided to save some money by stopping paying for it, as most of my photo work is done in DxO PhotoLab.
After trying a couple of alternatives (sorry, I deleted any others I tried and can’t remember the names now), I decided that the downside of cost was playing against the upside of efficiency. I signed up again for Lightroom Classic and tried the demo of Negative Lab Pro. While I find the interface a little bit esoteric, it doesn’t take much time to get familiar with it, and the speed it now affords me to get to the ‘starting point’ for every frame is worth the cost to me. The demo mode let me process, if I recall correctly, 24 frames before I had to purchase. In those 24 frames I had seen enough to buy a license.
Wrap Up
If you’ve read this far, you may be wondering if it’s worth going to all the trouble I have, when a scanner setup is much simpler at the outset. The scanner is certainly quicker to start with, but it opens you up to many more hardware or software issues. I’ve had issues with USB cables and USB hubs before, which you could say are unrelated, but the number of software issues I have had has been considerable.
There is not a highly competitive market for scanning software. I think VueScan is the best there is, and the best value for money, but it is not without its problems.
It took me many attempts to understand multi-frame mode. I wrote my blog post about it over three years ago and since then it has consistently been the most visited page on this site, linked from multiple photography forums and web sites. Which is to say, it’s fiddly!
Epson Scan 2 is far easier to use, but only until it gets fooled by an under- or over-exposed photo and mis-identifies the frame or, at worst, completely skips it. When this happens, your only recourse is to go completely manual for every frame on the scanner bed. With the Espon V600 that means manually cropping up to 12 frames.
I’ve also tried SilverFast. A license for some version of this was provided with one of my scanners. In my testing, it was even more esoteric than VueScan and suffered from some of the same problems as Epson Scan 2.
Any of these software packages — VueScan, Epson Scan 2, SilverFast, or any equivalent — will be a generic solution, covering both backlit and reflective scanning, colour and monochrome, documents and photos etc. It also has to work for you to get any version of your photos digitised.
DSLR scanning does add the wrinkle of negative-to-positive conversion, but other than that, there is no software and minimal computer-connected hardware involved, if any. My camera and SD card reader are reliable whether in this role or my regular photography.
I now have reasonably-sized, standard RAW files which I can then feed into the post-processing software of my choice.
Credits
Much of my journey was informed by the experiences of others. None more so than the creator of The Essential Film Holder.
A lot of my equipment choices, camera settings, and process techniques come from this incredibly helpful page.
Once I had chosen Negative Lab Pro, I found more very useful information on their site, specifically with respect to DSLR scanning.
I consulted many more sources on specifics, particularly regarding the light panel, but my basic knowledge is owed to the above two sources.
Of course, I owe this entire journey to Teo Crawford’s video on YouTube.
Epilogue
While not strictly related to the DSLR scanning process, there is another piece of software I own that I frequently bring into play with my scanned images, be they from a flatbed or my DSLR.
Scanned images often suffer from softness, grain, noise, and dust. When I select frames that I am going to “polish up” for publication, I will usually follow these steps.
- Crop in Lightroom, to remove outside the exposed frame.
- Tweak exposure and basic colour with Negative Lab Pro.
- Round-trip the image through Topaz Photo AI.
Photo AI is a combination of Topaz’s older Sharpen, DeNoise, and Gigapixel products. It has these functions (sharpen, de-noise, and upscale) as well as many related functions, like face recovery, and some newer features like removing colour casts and adjusting lighting. It is powered by “AI” but don’t let that be your guide.
It doesn’t always work magic, but I have found that it is always worth running scanned photos through it, even if you have to make manual adjustments to its automatic processing. You won’t get decades old photos looking like they’ve come from a modern DSLR, but they will generally look a lot nicer than the raw scan, with little effort.
- It can handle two strips of six, but the vast majority of films were cut at the lab into strips of four to fit in the typical photo envelope. ↩︎
- Based on my earlier recollection of the scanner speed, which I think I may have underestimated. ↩︎
- For black and white film this is a lot easier as black and white film stock is usually not tinted in any way. ↩︎
Comments
Fascinating stuff Alistair, I have lots of negatives lurking in a cupboard. One day I intend to get them out and attempt to scan them. Having read this, I’m probably not going to bother with a scanner, and will go straight to the camera method.
This is such an interesting setup. The only thing I couldn’t figure out is how you do the manual focus sitting down. I know you’re quite tall but is the digital display on your DSLR at that height really where you can see it precisely enough to focus? Also, nice pen holder…
Focusing ‘by eye’ is problematic in this situation (and I’ve never been great at manual focusing anyway). I use Live View, where the camera puts a live view from the sensor on the screen, which means I can use Focus Peaking. This is where sharply focused edges are highlighted on the screen with (by default) white. Focusing then becomes the simple task of rotating the lens focus until I see the most white lines covering the negative on the screen.
Why? Here is my method: take phone out of pocket and take picture of photo. Done. Great results.
If that works for you, great! For me it presents several problems. The first of which is in some cases all I have are negatives. But the main reason I prefer to capture from the negatives is consistent quality. I’ve tried manual phone capture and also dedicated apps for the task, and the results are nowhere near as good. Reflections alone are a real challenge. Also, I don’t just look at photos on my phone; I have a large, high quality display. Even original photos from my iPhone 11 Pro look terrible (to me) on that display. A photo of a print is just not up to scratch.